The Phriendly Phishing Phish Reporter provides a simple way for staff members to report potential phishing and scam emails easily with one click.
For updates and new releases, please refer to Phish Reporter Release Notes
Key Features
- Easy to identify if the reported email is a Phriendly Phishing email sent to the individual
- Provide a custom experience to reassure your staff they are correctly identifying phishing emails
- One-click to report the phishing email to an internal email address of your choosing (e.g. your service desk)
The system can be configured individually as per the installation guide below, or can be installed using your preferred Group Policy installation techniques.
Installation and Feature Requirements
- The Phish Reporter Outlook add-in supports Microsoft Outlook 2010, 2013, 2016, 2019 in both 32bit & 64bit.
- Both the Phish Reporter executable and configuration file are required to activate the add-in.
- VSTO (Visual Studio Tools for Office) add-ins, which are utilized for the Desktop Version are not compatible with the new Outlook mode. New Outlook is a web-based application that exclusively supports web add-ins, while VSTO add-ins are specifically designed for the desktop version of Outlook.
Below are required but can be installed during the set up after the executable has been run.
- Microsoft .NET Framework 4.5 or later version.
- Visual Studio 2010 Tools for Office Runtime
- 100MB of free disk space
How to install the Phish reporter (Desktop Version)
- Go to the Phish Reporter tab located on the left-hand side of your dashboard.
- Now that you are in the Reporter Settings page, fill in the mandatory fields with your company details and select ‘Save Settings’.
- Once you have filled in and saved your settings you will need navigate to the Desktop Version details at the bottom of the page. From here you can download the required configuration file, to do this click ‘Generate Configuration file’ and save the ‘OutlookAddinConfig.bin’ file when prompted. This file will be used later in the guide.
- You can download the required .exe installation file by selecting ‘Download Outlook Add-in Desktop version’. The 32 and 64 bit MSI installation files are also available to download below it.
- Run the Phish Reporter executable.
- The Phish Reporter may need to install additional software, as mentioned in the Requirements. Follow the prompts to install .NET Framework 4.5 and Visual Studio 2010 Tools for Office. Alternatively, if you have the required software installed skip to step 12.
- To install .NET Framework 4.5 and Visual Studio 2010 Tools for Office Runtime click Next.
- Read through the EULA and accept the terms before clicking Install.
- Click Finish.
- Read through the EULA and accept the terms before clicking Next.
- Click Finish.
- The Phish Reporter installation process will now begin. Click Next when prompted.
- Read through the EULA and accept the terms before clicking Next.
- Select a destination folder that you want the Phish Reporter installed or use the default location. Click Next.
- Click Install.
- A security warning will appear. Confirm that you want to continue with the install by clicking Yes.
- Click Finish.
- Navigate to the folder location specified in step 14. The default location is C:\Program Files\Phish Reporter and copy the ‘OutlookAddinConfig.bin’ file downloaded from the portal (created in step 3) into this location.
- Restart your Outlook client.
Congratulations ! You have now installed the Phish Reporter. This will be available in the Home Ribbon in Microsoft Outlook.
Information
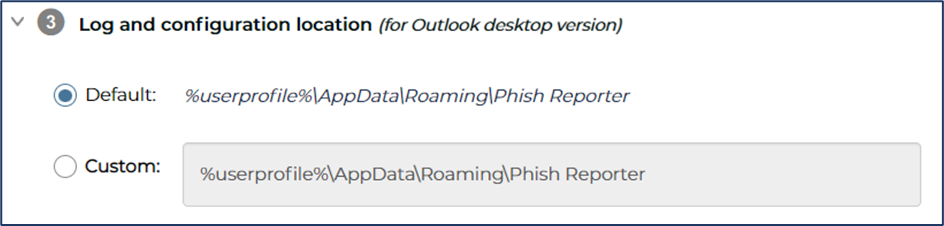
- When Outlook is run for first time, it will create folder for the logs and configuration file. This process will copy the configuration file from the C:\Program Files\Phish Reporter folder and generate a text log file.
- The default location is %userprofile%\AppData\Roaming\Phish Reporter and can be changed in section 3 of the Phish Report settings within the portal.
Explore Phriendly Phishing's award-winning course catalogue here!
Comments
Very stupid article because it doesn't tell you how to get the Desktop it illustrates.
Typical time waster.
Ernest Dunwoody
Please sign in to leave a comment.