The Phriendly Phishing Phish Reporter provides a simple way for staff to report potential phishing and scam emails easily with one click.
Important
- For any updates and releases please refer to Phish Reporter Release Notes.
- This Phish Reporter version can be installed using a centralised deployment in the Microsoft Office 365 Admin Centre.
-
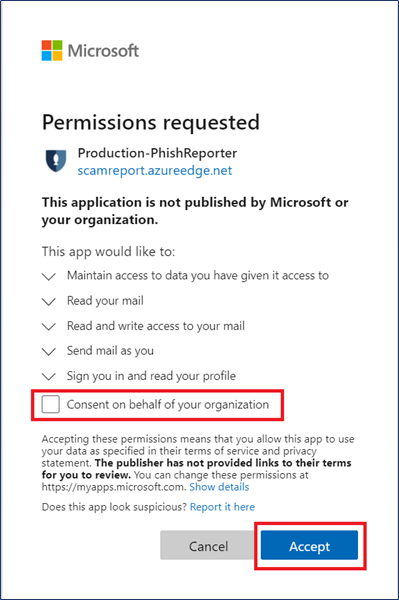
Someone in the Organisation who is a Global Administrator in O365 environment should Grant Consent on behalf of the Org to avoid all users from needing to Accept Permission individually when reporting an email.
- If deploying the Ribbon Version, you will see 2 Phish Reporter buttons (left and right side), and using either buttons to report an email should work.
Key Features
- Easy to identify if the reported email is a Phriendly Phishing email.
- Provides a custom experience to reassure your staff they are correctly identifying phishing emails.
- One-click to report the phishing email to an internal email address of your choosing (e.g. your service desk)
- Phish Report Results to track Phriendly Phishing simulated, safe emails and other reported phishing emails.
Installation and Feature requirements
- A must for a Microsoft Global Admin to grant consent as mentioned in below steps. Otherwise, users will encounter the "Unexpected IT Error...." message
-
Outlook add-ins : Your environment must be one of the below supported hosts for Outlook add-ins.
O365 Legacy O365 Modern Outlook 2016 on Windows Outlook 2021+ on Windows Outlook 2019 on Windows Outlook on the web for Exchange 2021+ Microsoft 365 Outlook on iOS Outlook on Android Microsoft 365 - If the user or learner is connected to Office 365 or Outlook.com, mail server requirements are all taken care of. However, for users connected to on-premises installations of Exchange Server, the following requirements apply.
- The server must be Exchange 2013 or later
- Exchange Web Services (EWS) must be enabled and must be exposed to the Internet. Many add-ins require EWS to function properly.
- The server must have a valid authentication certificate in order for the server to issue valid identity tokens. New installations of Exchange Server include a default authentication certificate. For more information, see Digital certificates and encryption in Exchange 2016 and Set-AuthConfig.
- To access add-ins from AppSource, the client access servers must be able to communicate with AppSource.
- The client must be connected to an Exchange server or Office 365 using a direct connection. When configuring the client, the user must choose an Exchange, Office 365, or Outlook.com account type. If the client is configured to connect with POP3 or IMAP, add-ins will not load.
How to install the Phish Reporter (Office 365 version)
- Log in to your Priendly Phishing account and navigate to
tab located in the left-hand side of your Dashboard.
- Fill out all mandatory fields per this help guide, Phish Reporter: Settings Configuration and Compatibility and
.
-
Once completed, scroll down to the O365 details at the bottom of the page to download the required manifest file. You will see:
- 2 radio buttons (Legacy and Modern) : Download the version with System Requirements that meets your environment
-
2 Manifest Files (Ribbon and Non Ribbon)
Users Guides for both O365 Versions:
- In Microsoft Office 365 Admin Centre from the sidebar, navigate to Settings > Integrated apps > Add-ins.
- Click
and Next button.
- Select Upload custom apps.
- Select Choose file and upload the Manifest File you previously downloaded.
-
Select Upload.
If you have already deployed the add-in and just need to update, please refer to O365 Phish Reporter : Update using Manifest File
-
Configure the add-in per below screenshot.
For testing purposes, choose the radio button Specific users / groups.
- Before Saving, check if there are 11 permissions listed. Select Save. You will then see the add-in installing.
- Once deployed, message below will appear. Click Next.
-
Click Close Notes.
Note : The Phish reporter Outlook add-in could take up to 72 hours to display in users' Outlook Ribbon. Users may need to relaunch Office.
Congratulations ! You have successfully deployed our Phish Reporter. Do try reporting an email, as a first time reporter, you will be asked to log-in with your Microsoft Credentials.
Comments
Please sign in to leave a comment.